Tactics
This chapter is ©2015-2019 tom-r and reproduced here from the original source, together with the source code containing tactic_pi algorithms and methods under the GNU General Public License v3 (GPL v3) – Likewise, modifications in DashT software into those algorithms and their description in this chapter and in this document are ©2019-2020 canne, and published under the same license. Please feel free to fork and copy this work but if you plan to publish it, please keep this notice unmodified in the document together with any copyright statement in the source code.
Introduction
Everything started with the question : “Do we make it around the edge of that island when we tack now and sail the same apparent wind angle on the other tack?“
Disclaimer: This is still alpha code (not even beta), and you should not use it for live – real sailing. I will not be liable for any harm, damage or whatever strange things happen if you use this plugin and rely on its data.
What Tactics can do?
Calculate true wind data : TWA, TWD, TWS from true heading (HDT), speed through water (STW) and apparent wind speed (AWS), with optional correction by the heel angle. Calculation is enabled via a preference setting and disables available true wind data from the bus throughout the tactics_pi plugin ;
Calculate the “leeway”, the boat drift based on heel. A common formula is used for that purpose ;
Calculate the surface sea current and display it as single instruments (current speed/direction) as part of the “Bearing compass” or as overlay on the chart (semi transparent). The routines take boat heel and leeway into account. If you don’t have a heel sensor, there is a simply workaround, see below. Current display on the chart can be disabled by a preference setting ;
Calculate and display the boat laylines for the current tack, and the same TWA on the other tack. Sea current is taken into account, if available ! Laylines may be toggled on/off. Adjustable length and max. width (triangle, with one corner at the boat) of the boat laylines. The layline width reflects the boat’s yawing (COG changes over time) ;
You can load a polar file and calculate/display performance data, like actual VMG (velocity made good up-/downwind), Target-VMG, Target-TWA (the opt. TWA up-/downwind), CMG (course made good towards a waypoint), Target-CMG (opt. CMG angle and speed), polar speed (the speed you should be able to sail at current TWA/TWS based on your polar) ;
It can display the actual polar as overlay on the chart, including markers for Target-VMG/CMG angles. Just adopt your course and place your heading pointer on one of the markers, and you sail Target-VMG/CMG based on your polar ;
You can set a (one !) temporary tactics waypoint and display the laylines to the mark, based on a Target-TWA calculation, while taking your polar into account ;
It has a “dial instruments” called “Bearing compass”. Boat true heading (HDT) points “up”, it shows the boat laylines as well, the surface current, a pointer to the waypoint (either set manually as the temporary Tactics waypoint or read from a NMEA RMB sentence), needles for AWA and TWA, markers for the Target-VMG/CMG angles ;
It has a “Polar compass” instrument, graphically displaying the actual polar ring and markers for Bearing to WP, Target-VMG angles and Target-CMG angles ;
It has an “Average Wind” calculating background process with short and long term time scales. A graphical instrument is provided with an adjustable averaging time, displaying both numerical values and both short and long term deviations to port / starboard
It can create specific NMEA performance records with the purpose to export them to the displays of your instruments. You can now e.g. calculate the polar target speed in the plugin and send it to your instrument display outside in the cockpit. Currently only available for NKE, but may be enhanced in the future ;
It can export the data from BaroHistory, WindHistory and PolarPerfomance instruments to a flat text file with selectable export rate and column separator (via ini file). The export will either create a new, or append to an existing export file ;
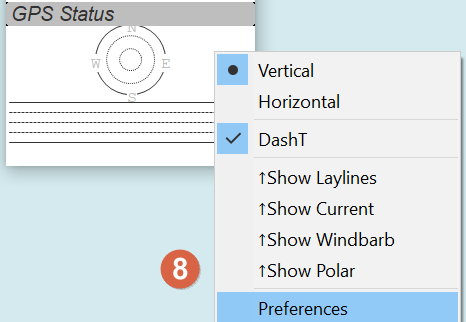
Various Tactics settings are grouped in a separate tab in the Preferences configuration dialog of DashT. To access the preferences dialog, right mouse click on any DashT instrument, then select “Preferences” (8);

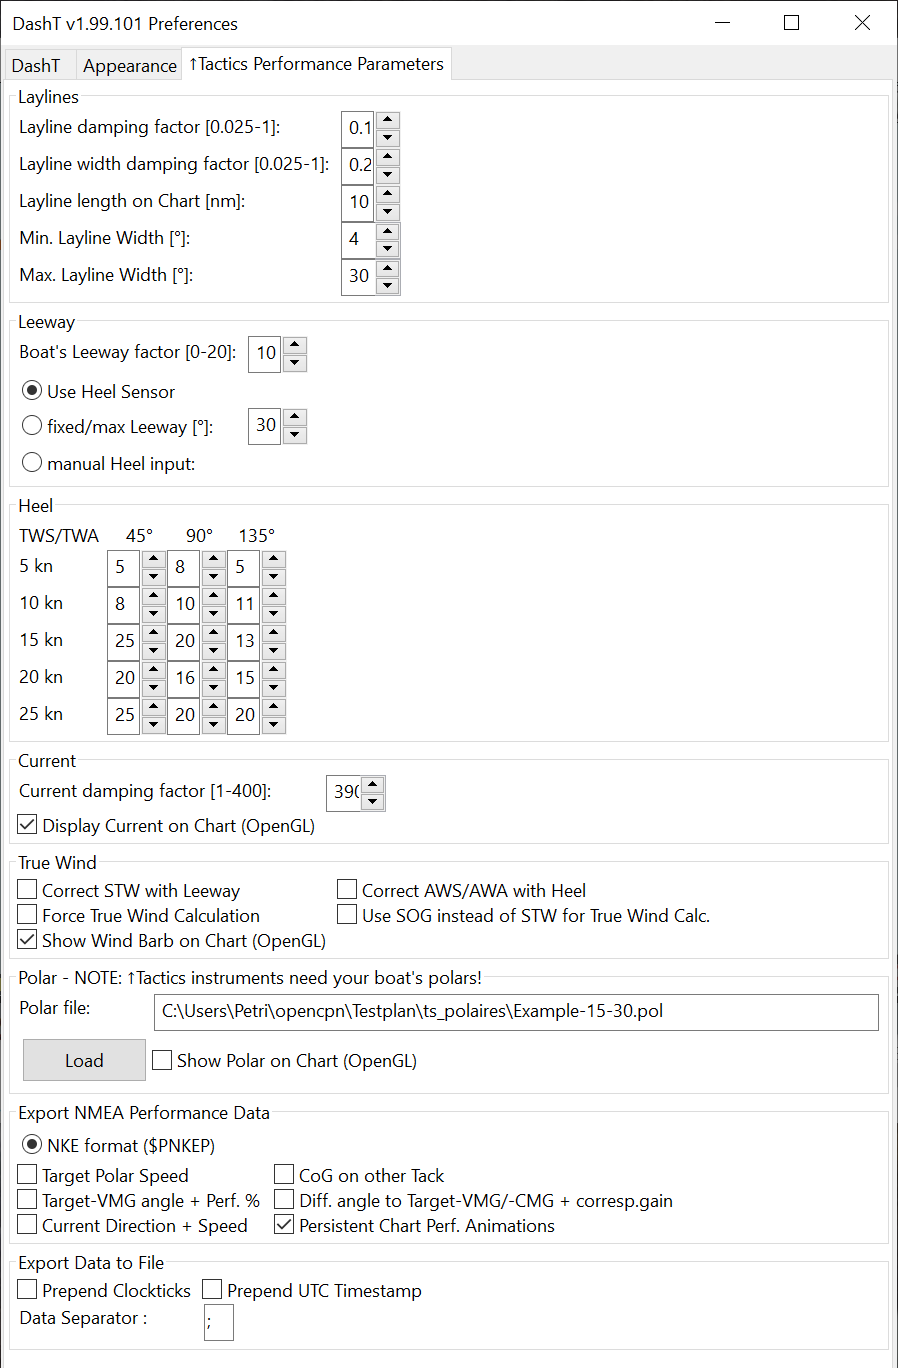
You’ll find all seetings in a separate tab “Tactics Performance Parameters” (1):
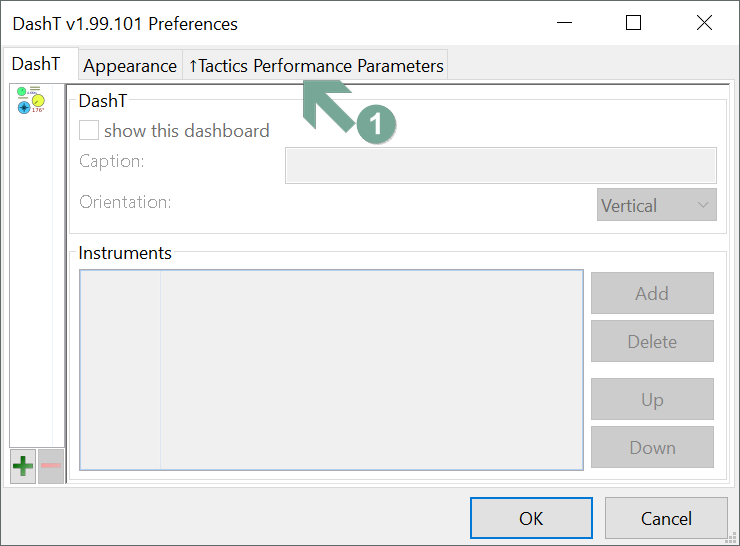
There are pop-up ToolTips available for almost all of the Tactics preferences. Just hover the mouse over any of the settings to get explanation and usage description.
Below is a screenshot which depicts all the Tactics parameters which can be changed from the Preferences dialog. Hover the mouse over each parameter to get an explanation. To get the same explanation and some additional hints, see the tweaks explained later on in this document which explains the items which can be changed in the ini/conf-file.

Prerequisites
You will need to activate OpenGL, if you want to use the chart overlay functions ;
SOG, COG from the GPS ;
True Heading from an electronic compass. If not available, magnetic heading will do, as long as you have magnetic variance available. It can be available from these sources, in this priority order:
From OpenCPN GPS Fix ;
HDG-sentence ;
RMC-sentence (likely already used by OpenCPN for fix) ;
From from the wmm_pi plug-in.
Boat speed through water STW from a log / “paddlewheel” sensor (keep it clean!) ;
Apparent wind angle AWA and Apparent Wind Speed AWS ;
Heel sensor which supplies your boat’s heel angle, also calld “roll”. If not available, there’s a workaround with manual input in preferences ;
You need a polar file of your boat to use all polar based performance calculations, explained in a separate section in this document ;
Calibrated sensors or corection to AWA, Compass HDG/HDT, STW (Speed through water), and AWS (apparent wind speed), as good as possible. Especially the compass heading calibration tends to be neglected. However, this is vital for a proper surface current calculation. All I can say is : sh*** in – sh*** out … ;-) .
CMG/VMG abbreviations
The terms CMG and VMG used in this documentation are not unique across instrument manufacturers and other sailing software packages, even in OpenCPN and in Dashboard “VMG” is used in routing functions! This software will still use both terms, familiar to the intended target users, both in the software and here, in this documentation. However you can change both terms by setting two preferences in the ini/conf-file file. See the corresponding chapter how to do that.
See also the Terminology at the very end for the definition of terms.
Without Polar
The instruments and functions in this chapter do not require that you have your boat’s polar.
Calculate true wind data
The plug-in can calculate true wind data (TWA, TWS, TWD) but keeps the calculated data inside the plug-in. (it does not broadcast it to OpenCPN!)
True wind calculation is done silently if you don’t have TWA, TWS, TWD available in your NMEA stream. Furthermore you can force the true wind calculation in the plug-in by a preference setting. If the tick “Force True Wind Calculation” is set

It does not matter if TWA, TWS and TWD are already available on the system or not. Calculation is done in the plug-in if you select this option. It does calculate TWA, TWS and TWD.
This is useful in case, for example if you have a heel sensor but which is not integrated in your instrument bus. You can use the corrections to get more accurate true wind data by taking into account the heel (roll).
Input is AWA, AWS, STW, and for TWD also true heading HDT.
NOTE: DashT has a special function for a moored boat which is enabled by the Force True Wind Calculation option: normally, one needs STW (i.e. some speed) to create the vector calculations for True Wind. DashT detects if the STW is not null - your instruments are awake - but that the speed is less than 0.2 knots. In this case it calculates the True Wind Direction (TWD) solely based on the HDT. This might be useful if you are observing the wind evolution using the wind history instrument in a safe harbor or mooring. But if there is a big swell or a strong current, this function may cut itself off because of sporadic STW values.
If you don’t have HDT on your system bus (but only HDG), you can use wmm_pi plug-in: it supplies the magnetic variation and if it is enabled, it value is fed into DashT by OpenCPN and its value is taken into account to calculate HDT from HDG.
Troubleshooting: if you have issues with the true wind calculation in DashT, take a look at the OpenCPN log-file. DashT collects the information needed by the Tactics algorithm, reporting the progress in the log file with dashboard_tactics_pi identifier to help in the troubleshooting in case of some data is missing, for example.
SOG instead of STW
You can select to replaces STW (Speed through water, the “paddle wheel” or the “log”) with SOG (Speed on ground, from the GPS) in the Tactics algorithm true wind calculation.
The purpose of this option is to have a fall-back for the true wind calculation in case your paddle wheel gets clogged.
However, it can be considered also as a way to eliminate the effect of the surface current to the True Wind calculations: Some racers like to refer to the water on which they are gliding, but some other sailors like to refer to the terra firma over which the wind is blowing… make your choice with this option!
Heel corrections
If you have a heel sensor in your system, and its data is available to DashT, you can use the two following corrections:
Correct STW with Leeway : the plug-in can calculate your leeway (drift angle) based on on your heel sensor (see below). That means your boat is possibly moving sideways, which adds an error to the True Wind calculation. Standard instruments normally do not take this effect into account. For example NKE does this correction in its regatta processor only, but not on their normal instruments. Please take also into consideration the following paradigm: Leeway calculation uses \((STW^2)\) which would lead to to a circular definition (cf. Tactics v1.0.009). That is why leeway is not corrected, in circular manner with the corrected STW. However, the corrected STW is used on all other algorithms where it is applicable, for example in the current calculations ;
Correct AWS/AWA with Heel : This option corrects your AWS and AWA data by the heel angle. Use this option with great care! Manufacturers normally already make this correction if you have a heel sensor integrated in your instrument bus. OpenCPN will simply receive the already corrected data for AWS / AWA in this case. If you apply now the correction the result would be wrong! The option is provided mainly for systems using an external heel sensor, such as built with an Arduino but which is not recognized by the boat’s instrument system. To make sure that you understand the eventual risk of a double correction, a warning pop-up is shown when you set this tick. See Sailboat Performance Testing Techniques, A.Gentry, 1981.
Calculate Leeway
Leeway describes the drift of the boat due to the force of the wind. Leeway is the basic input for the surface current calulation described later on. Input for the leeway calculation is your heel angle. Normally you’d say : the more you heel, the more you drift. But that’s only part of the truth. Other significant inputs are boat speed and the shape of your hull.
A widely (NKE, B&G,…) used formula calculates the leeway with 3 input values : heel, boat speed (STW), and hullshape-factor.
\(Leeway = LeewayFactor*Heel/(STW^2)\)
See the Leeway instrument which uses this formula. Please note that while the Heel has a direction, there is no other indication for the actual wind direction.
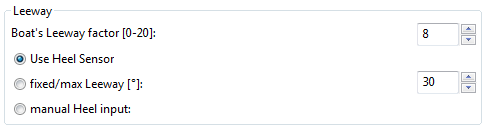
The LeewayFactor attribute in the above formula is for you to provide, for your boat or the sailing condition. It is given in the Tactics Preferences, in the parameter called “Boat’s Leeway factor [0..20]:”
The input range is 0…20, 10 is a good value to start with.
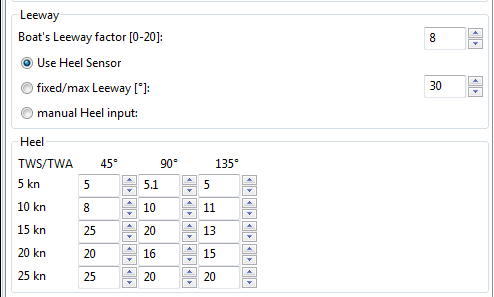
If you do not have a heel sensor on board, you can either set a fixed value ( e.g. 0 when motoring without sails), or try to set up a very simple “heel polar”:

The idea of the “heel polar” is that almost every magnetic compass installed in the cockpits has a scale, where you can read the degrees of heel: simply compare the DashT Dashboard instruments display, for TWA and TWS, read the values from the scale and put it into the small table above.
NOTE: Please make sure to read the True Wind Angle (TWA) and the True Wind Speed (TWS) and not apparent wind angle and speed (AWA/AWS).
I tried it on my own boat, comparing the heel polar values with those of my sensor. It works astonishingly well.
Even if you use the heel-polar, you have to estimate the “Boat’s Leeway factor [0..20]:”
You have 3 choices for heel input, depending on where you set the radio button in the preferences. You can switch the radio buttons forth and back while sailing to compare the results, or as a tactician to take into account different sailing conditions.

The attribute “fixed/max Leeway [°]:” has a dual purpose:
The given value is always taken into account as maximum possible Leeway value. In the screenshot below, I set it to 30°. If your heel polar or calculation with the formula above outputs values >30°, the program takes 30° ;
If you set the radio button here, the routines always take 30°, no matter what your sensor calculates or your heel-polar would tell you.
Calculate the surface current
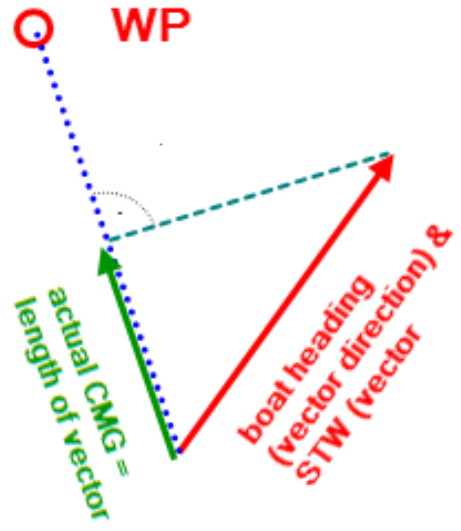
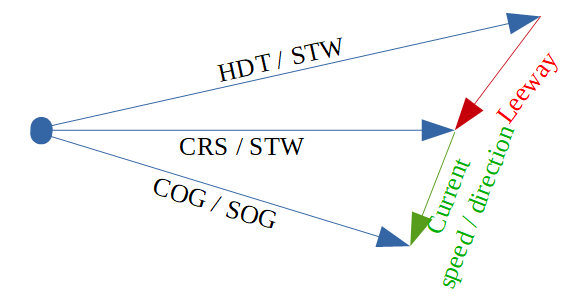
If you compare your HDT and COG vectors in OpenCPN (the 2 forward vectors on the chart at your boat), the difference between both is a mixture between Leeway (the boat’s drift) and surface current. Once we can determine Leeway, the rest is surface current.
The surface current calculation is simply a triangle calculation with vectors.
Always seen from the current position, the first vector is HDT (degrees) / STW (length).
As your boat drifts with the wind, the second vector is “course through water” (CRS, degrees) and STW (length).
Course through water is actually HDT with applied leeway.
The resulting vector between CRS/STW and COG/SOG is the surface current.

To calculate the current, you need as input HDT, STW, Leeway, COG and SOG and your GPS latitude / longitude.
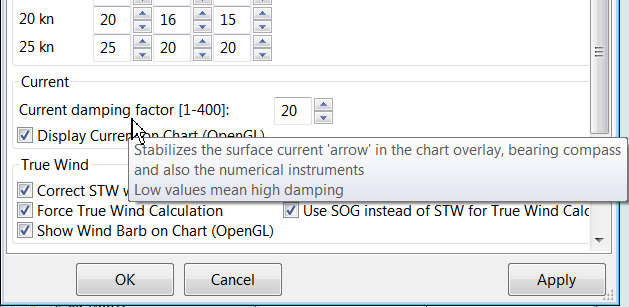
In the preferences you can set the damping factor for the current calculations : the lower the values are the more filtering is applied, and the reading gets more stable. On the other hand, it starts lagging a bit. The lower the value, the more damping is applied. You can do experimenting in the range of 0.001 to 0.025. Keep this value at the lower end, then start to increase, until it gets unstable.

NOTE: Tactics algorithms currently always corrects STW with Leeway for the current calculation, independent of the preference setting “Correct STW with leeway”. This may change in a future release but even then the default setting will remain as it is.
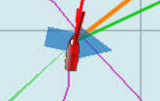
Current arrow on chart
You can show a semi transparent blue current symbol underneath your boat, showing the surface current direction.
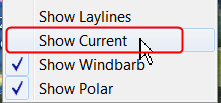
To activate the current display on the chart by default, upon program start, navigate to the Preferences dialogue and set the tick “Display Current on Chart (OpenGL)”. The preference is only setting the default; while navigating in OpenCPN, you can turn the current overlay display on / off as you like:
Just right-click on any DashT instrument and select “Show Current” in the
contextual menu
This will toggle the current display arrow on/off.
Boat laylines
You can show the boat laylines on the chart. They refer to COG.
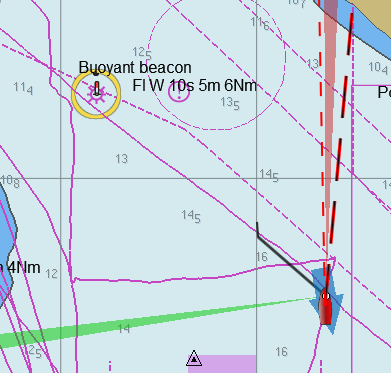
The colours mean:
red = wind from port ;
green = wind from starboard.
The width is defined by the yawing of your boat, the more there is yaw, the wider the laylines do get.
The second layline (green in this example) simply shows you where you would get on the other tack / gybe when you sail the same TWA after the tack. Leeway and current are taken into account for the calculation of the second layline:
\(\Delta COG = (COG - HDT) + 2*TWA + \lvert Leeway \rvert + CurrentAngle\)
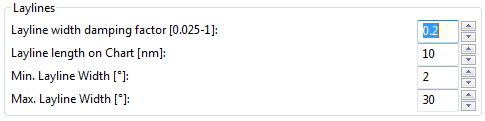
In the Preferences, you can set the following options:

The “Layline width damping factor” is the rate how fast the layline width reacts on COG changes.
It’s done with exponential smoothing, the smaller the factor, the higher the damping rate.
You can define the length of the laylines on the chart, as well as a minimum and maximum width.
If you don’t like the yawing effect simply set min and max both to 1 or 2 degrees.
To toggle the layline display on the chart on/off, right-click on any DashT instrument and select or unselect “Show laylines” from the contextual menu.
Wind barbs
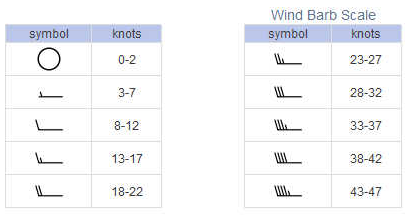
You can also show a wind barb at the boat position, showing you direction and speed (feather length) in 5 kt steps.
To activate the wind barb display on the chart by default, upon program start, navigate to the Preferences dialogue and set the tick “Display Wind Barb on Chart (OpenGL)”.
The preference is only setting the default; while navigating in OpenCPN, you can turn the windbarb overlay display on / off as you like: to toggle the windbarb display on the chart on/off, right-click on any DashT instrument and select or unselect “Show Windbarb” from the contextual menu.
Tactics brings in some improvements to the windbarb presentation, inherited from other OpenCPN plug-ins, it shows the wind barbs up to 47 knots(!) correctly with the following mapping:

Current Direction and Speed
NOTE In DashT the Tactics instruments are identified by an up-arrow ↑ - for performance boost they provide!
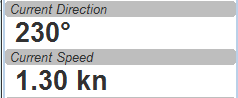
Current direction means: “current sets into”.
Leeway
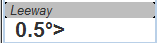
Boat drifts 0.5° to starboard due to heel or roll, see Heel instrument.
NOTE: See the formula for leeway’s calculation: it does not take into account the direction of the wind. Therefore the direction arrow displayed is that of the direction of the heel, positive values received from the instrument are for the starboard heel and negative values for the port heel. In very light winds this logic may be flawed and the value itself based on a hull factor may not make sense.
Average Wind Instrument
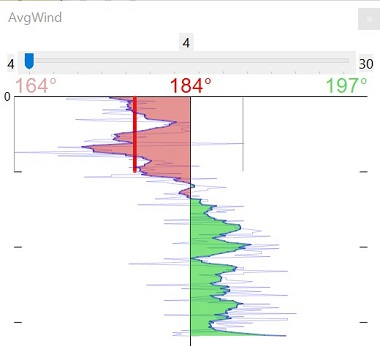
The graphical instrument shows the average wind and its deviations to both sides.
This instrument is also used to control and display the result of a background processing average wind calculation using Tactics double exponential smoothing algorithm. It is recommended to have it in your instrument catalog if you plan to use any other instrument requiring the information about the average wind.
DashT has a continuously running background process keeping these values available for all instruments, such as TWA to Waypoint, Race Start and Race Mark even if this instrument is not active or shown.

The curve is centered on the average wind, green means the wind is on starboard of the actual average wind, red means it blows more from port.
One can adjust the averaging time in steps of 1 [min] between 4 and 30 mins.
“Short” integration time is from 10 .. 50 % of that time, default is 25 % integration time. That value has its own slider which is depicted with a red or green thick bar and the corresponding, sliding minimum and maximum value lighter bars in the upper part of the diagram. This feature can be turned off in the ini/conf-file. See the corresponding chapter explaining the parameters.
The red number in the center is the average wind direction, left and right is the min and max (unfiltered) wind angles to either side.
The very thin lines are the unfiltered wind direction input from the instruments.
To adjust the time average, just pull the slider left / right.
The vertical scale is [minutes], short dashes every minute, full horizontal line every 5 minutes.
The instrument has its own timer, so it’s independent of the data connection speed or rate.
The idea of this instrument is following: if you sail in puffy, changing winds it allows you to see graphically when the wind changes to the other side. In theory, you should tack, as soon as the wind veers away and crosses the average wind direction
Race Mark is another instrument which can be used to determine if a tack imposes or not. It provides your location on the ladder rungs, giving also the idea is the wind shift a lifter or a header.
TWA to Waypoint
To use this instrument, you need to drop a Tactics waypoint on the chart, using the right-click context menu on the chart canvas. Altenatively, you can place a waypoint in GPS so that it appears to OpenCPN in an RMB-sentence. If you define both, Tactics WP takes the preference.
This instrument requires also the averaged wind data processing running continuously in the background. How to obtain it will be explained below.

This instrument is meant to check the TWA on the (new) tack prior to sailing the tack/gybe manoeuvrer.
Once you know the TWA angles of your sails, this is very useful e.g. to see which of your downwind sails to use on the next tack.
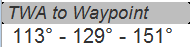
The instrument shows three data values:
minimum instantenous or short term average TWA
long term average TWA
maximum instantenous or short term average TWA
All 3 values are exactly the same data as used in the Average Wind Direction instrument, just recalculated to TWA towards a waypoint.
NOTE 1: one cannot refer from and to port / starboard side, values are simply sorted in the display the low and high.
NOTE 2: This instrument is controlled and is thus depending of the settings of the Average Wind Direction instrument. In DashT it has has been extented to include two range of averaging time, “normal” and “short” time span. This particular instrument using that data is set, in DashT to use the “short” time range (like for regatta) by default. Since this feature can be turned off in the Average Wind Direction instrument, this instrument automatically returns also back to “normal”, i.e to long average wind integration and smoothing time like in the Tactics v1.0.11. It is also possible to select the long integration time permanently for this instrument only, in the ini/conf-file. See the corresponding chapter explaining the parameters.
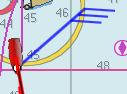
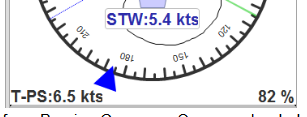
Once the wind veers from port to starboard side on full downwind courses the display can look like this:
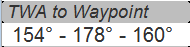
That means, average TWA is 178° and the wind deviates to 154° to one tack and 160° to the other tack.
Default time is 4 minutes, maximum 30 minutes. “Short” integration time can be adjusted (in the ini/conf-file) from 10 .. 50% of that time, default is 25% of the overall integration time.
To use Average Wind, both “Short” and “Long” in all DashT instruments needing that information, just define the ‘Average Wind Direction’ instrument in your list of instruments, open it once (per session) and move the slider to the integration time of your preference. You can close the instrument afterwards, just keep it in the list of instruments.
More use cases how to use this instrument to select which gennaker/spi or sail for the next tack:
Let’s say we have 2 gennakers on board, the first one start to work at 105°TWA, has its best perfomance at 120-125° and drops out at 135° TWA.
The second gennaker starts at 115°, has its best performance at 130-140° TWA and can be used all down to 160° TWA.
With the example values (113 – 129 – 151) from the first screenshot above you cannot stay on the direct course line to the WP with the second gennaker all time as it starts at 115° (whereas we recorded 113° TWA…), but overall it fits with its optimum performance (130-140°) much better to the average wind direction (129° TWA) than the first gennaker.
NOTE: DashT Race Mark is another instrument which can be used for this type of optimization process in case the race route can be marked in advance: it calculates the TWA values for two legs ahead.
Odograph
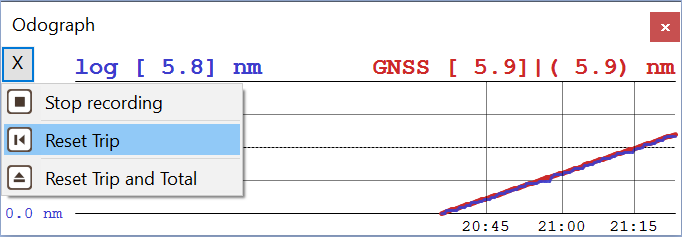
This registering odometer is a graphical history instrument like Wind History or Baro History. Like in all similar DashT instruments based on its enhanced Tactics race engine, storing the collected data is possible into a comma separated value (CSV) file for later analysis - in this particular instrument all the positions and the calculated distances and the direction between those will be stored.
NOTE: If you find it cumbersome to collect and combine data from various CSV-files after the race, please consider using DashT time series database streaming which allows you to collect all data for post-race analysis.
The instrument provides two level of trip counters. The first one, illustrated on the upper right corner is persistent, allowing to record and visualize the entire distance of the race course. The second one is a volatile trip counter which is intended to measure the progress within the current leg.
Registration and reset functions are controlled from the upper left corner button which has a symbol > when it is armed, and X when it the instrument is registering data in a CSV file. The above picture depicts the menu items.
By default the odograph is displaying also the boat’s own log data based trip information, i.e. a third trip data value is calculated from the boat navigation system’s total log, if it is available. Boat’s navigation system’s eventual trip counters are not read.
A racer is interested in evaluating the performance over the element on which he or she is moving, the water.
With this instrument being ground position based, one can use - or set - boat’s navigation system to get the boat’s speed as STW. One need to check this, of course but typically also the log data would be based on the paddle wheel rotation in this case.
With paddle wheel based log data the instrument allows a graphical comparison over a long period of time between the distance over the water and the distance over the ground. This can give indication about the changes in the water element on which we are moving, like the strengthening of the current or boat having an excessive leeway because of getting overpowered.
If the boat’s navigation system’s log is also based on GNSS position data and it cannot be configured differently, then that information has little added value in this instrument, of course. The collection of boat’s log data can be disabled permanently, see Tweaks.
Cruisers: While this instrument is targeting racers, it can be a handy assistant for any navigation with its two levels of accurate trip counters, frequent measurement based on GPSS data and OpenCPN’s own and proven Mercator projection distance calculation.
With Polar
The instruments and functions in this chapter require your boat’s polar.
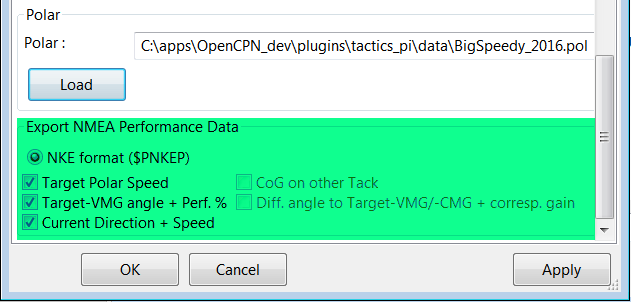
You can load a polar file by defining one in the Preferences dialog:

Click on the load button and select a polar file.
To clear the selection - to continue without a polar file - one needs to write a text NULL in the Polar: field and press Load button. An empty field means that you want to select a new polar file.
The format is the same that the polar_pi plug-in uses. Use that tool to display the polar, there is no polar visualization in DashT.
NOTE: If you do not have a polar, the Weather Routing plug-in of OpenCPN comes with quite a few polars of popular boats. Maybe you can find a polar close enough of your boat in there.
For racers, it is a good idea to prepare a few alternative polars simply by reducing the the polar speed by, say 10 percent: they can be used in bad weather conditions or by a single hand sailor who is not able to push the boat continuously to its limits.
When Tactics is loading the polar file, it is writing it into a two-dimensional static array having 181 lines for each TWA degree (0…180°) and 61 rows (0…60) for each knot of windspeed. It is a simple lookup table for the algorithm usage, having the purpose to reduce the processor load and increase access speed.
Polar Loading Procedure :
The TWA = 0 row and the TWS = 0 column is filled with zeros
The rest of the array is filled with NAN values.
The values from the polar file are placed at their corresponding spots in the array
The missing data in between given values (= not NAN) is then filled with average values.
NOTE: only polars with TWA / TWS / STW, where TWS and STW are in knots do make sense
While there is averaging to fill in the missing values, there is no extrapolating beyond the last valid values.
If you run in a 30kt wind, and your polar ends at 25 kts, then the performance instruments will give you a “no polar data” text. Please consider at that moment (if you have time) to turn on polar_pi / vdr_pi plug-ins to record new data since you obviously are a serious racer!
The only exception of the extrapolation is the range between the 0 kts windspeed and the first given value, where a simple averaging between the two is done.
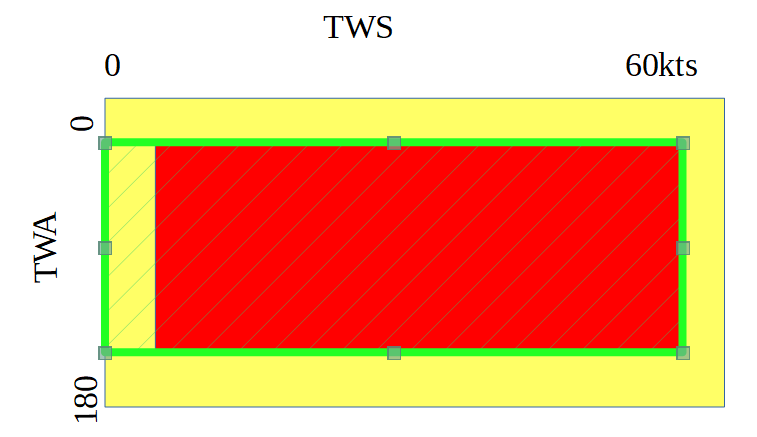
The below picture is an example input polar:

The below screenshot depicts the corresponding, generated lookup table used internally by DashT/Tactics. The lookup table generated from your polar file can be dumped to a file for inspections using the ini/conf-file key “PolarLookupTableOutputFile”.
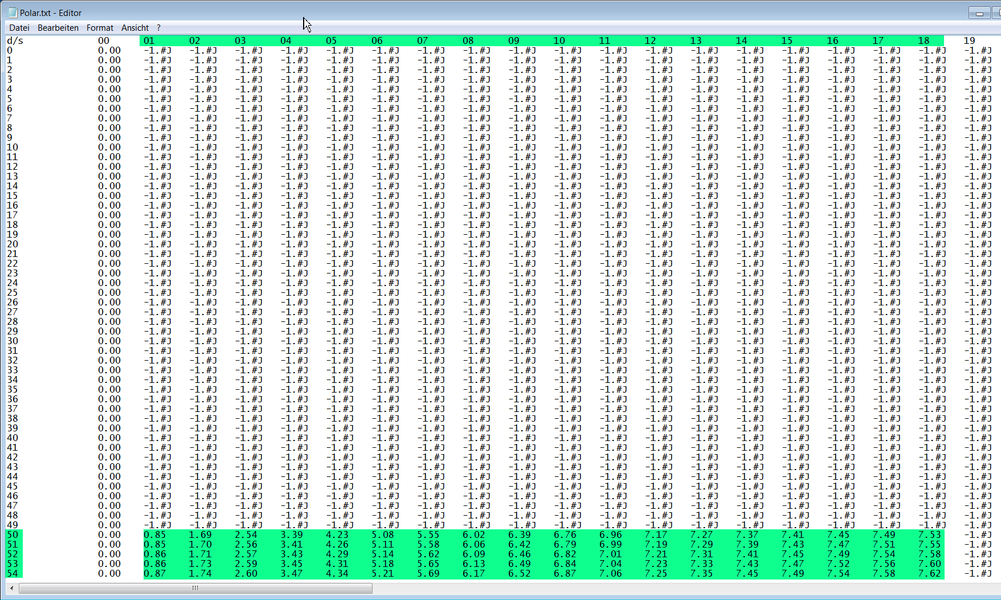
NOTE: Only True Wind Speed (TWS) values are averaged. True wind angle is still rounded to the next full knot. For testing, Tactics has implemented full averaging of both TWS and TWA as well, but live comparisons did not show improvement. Therefore this method of averaging TWS only has been retained. TWA will not have better accuracy than plus or minus one degree, due to upwash issues, position and accuracy of the wind vane, compass accuracy, etc.
Display polar on chart

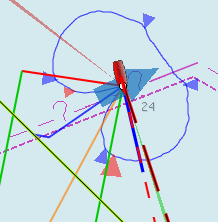
You can display the polar as overlay on the chart (OpenGL is required). The size of the different polar “rings” is normalized, they all have the same size. Nevertheless, the plug-in always shows the current / correct polar ring. The polar orientation is related to the true wind direction, and it shows blue markers for the Target-VMG angles up- and downwind, and red markers for the Target-CMG angles (if you have an active NMEA-RMB-sentence or a Tactics_pi waypoint set).
There’s also a small blue HDT line diplayed from the boat. The additional marker line for HDT is only to help you to distinguish which of the two OpenCPN red, default marker lines is for heading and which one is for the course over ground.
To sail Target-VMG / Target-CMG angle, simply steer the blue HDT pointer on one of the Target-VMG / - CMG markers.
As illustrated in the above screenshot, there can be 2 red CMG markers, the preferred one has a bigger size!
To activate the polar display on the chart by default, upon program start, navigate to the Preferences dialogue and set the tick “Show polar on chart (OpenGL)”.

The preference is only setting the default; while navigating in OpenCPN, you can turn the polar overlay display on / off as you like: to toggle the polar display on the chart on/off, right-click on any DashT instrument and select or unselect “Show Polar” from the contextual menu.
Performance data
Tactics performance algorithms are available plug-in wide and used, among the other DashT instruments in following original Tactics instruments.
Vector graph
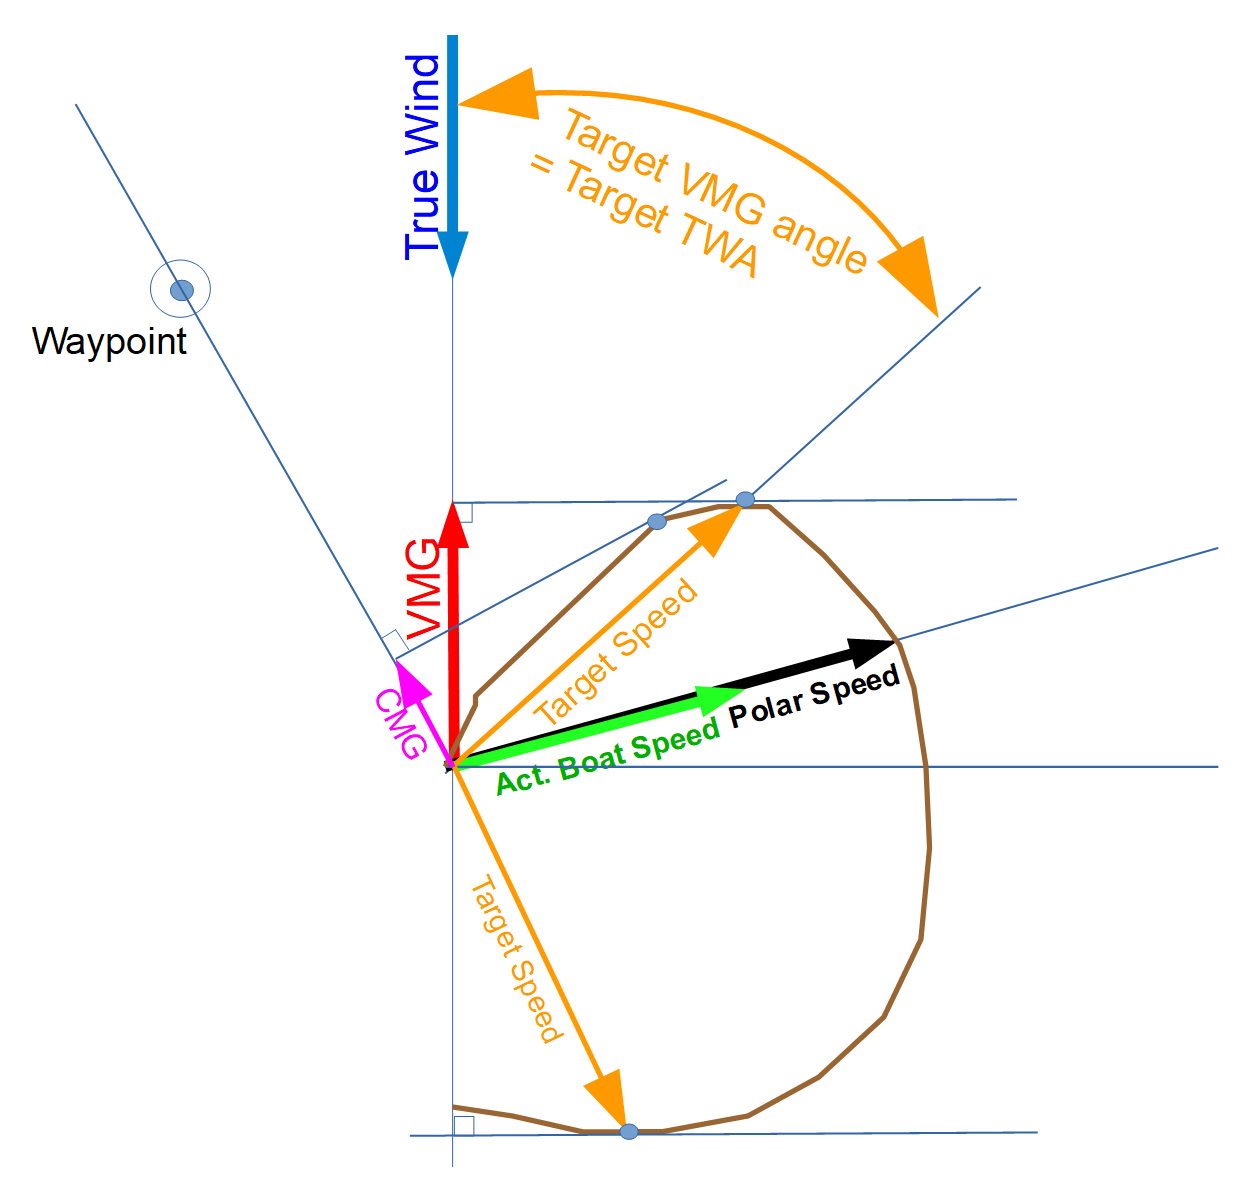
Let’s first take a look the following vector chart as for reference on the different terms in relation to the polar curve:

NOTE: We need to presume that you are familiar with the above terminology - if not, read about VMG to start with - but if you do not agree, say with the CMG definition you are free to change the abbreviations used in the application using the ini/conf-file settings, see the corresponding chapter explaining the parameters. All requests to change the nomenclature will be rejected since one has this option at his/her disposal. The vector algebra does not move.
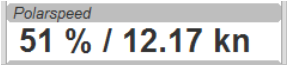
Some of the instruments are not showing a single value like on Dashboard, buth the value is split in two, displaying first a percentage value and then the value from which the percentaget is taken. Let’s take an example of the polar performance, displaying the percentage of your current speed of the polar speed of your boat at that moment:
Polar speed

This instrument is useful in crosswind / reaching conditions without a waypoint.
It shows the optimum speed for the given wind conditions.
This is simply the reference of what speed we should be able to sail based on our current TWA / TWS values. The % value is the reference to STW. In this example, we are currently doing (only) 51%, of what the polar has stored as optimum value. According to the polar we should be able to do 12.17 knots.
This is “Act.Boat Speed” compared to the “Polar Speed” in the vector graph.
Values below 100% mean that we are slower than the polar says, above 100% means that we are faster than the polar - if that persists, we should run the vdr_pi plug-in or DashT database streamer to record the new data since obviously our polar is not good.
NOTE: while the actual boat speed can be greater than the polar speed, the percentage value shown is limited to maximum of 150 % - if you see values like this, there is something wrong in the polar file, in the STW/TWA/TWS values or both.
DATA: the calculated data is made available to other instruments as
OCPN_DBP_STC_POLPERFandOCPN_DBP_STC_POLSPD: The instrument must be running (but not visible) - this is asynchronous, data arrival driven calculation, not a background process. However, the generation of NKE-Style performance records takes place every second based on the current data at that moment even if this instrument is available or not.
RECORDING: in InfluxDB Out by default is disabled, when enabled, the default record names are
performance.polar.polarSpeedRatioandperformance.polar.polarSpeed, respectively.
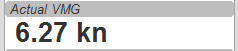
Actual VMG

The actual VMG is the “Velocity made good” referring to the wind direction. The means we’re moving with 6.27 kts into wind direction. Also works when we sail downwind, in case of which it is off the wind.
VMG = STW * cosine (True Wind Angle)
DATA: the calculated data is made available to other instruments as
OCPN_DBP_STC_POLVMG: The instrument must be running (but not visible) - this is asynchronous, data arrival driven calculation, not a background process.
RECORDING: in InfluxDB Out by default is disabled, when enabled, the default record name is
performance.polar.actual.velocityMadeGood.
Target VMG Angle
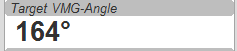
Also known as “Target TWA”; this is the optimum TWA (True Wind Angle) when sailing upwind or downwind for a given wind speed, based on your polar data. Very useful when sailing up-/downwind without a waypoint.
The program simply searches the polar with a given TWS for the optimum TWA up-/downwind. It is defined as the tangents on the polar.
DATA: the calculated data is made available to other instruments as
OCPN_DBP_STC_POLTVMGANGLE: The instrument must be running (but not visible) - this is asynchronous, data arrival driven calculation, not a background process.
RECORDING: in InfluxDB Out by default is disabled, when enabled, the default record name is
performance.polar.target.targetAngle.
Target VMG
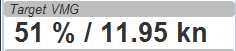
Also known as “target boat speed” (target speed in the diagram above), this value is the reference to the Target VMG-Angle. In our example it means : If we would sail with 164° TWA (from the example above), then we could make 11.95 knots according polar), but currently we’re doing only 51% of that.
DATA: the calculated data is made available to other instruments as
OCPN_DBP_STC_POLTVMG: The instrument must be running (but not visible) - this is asynchronous, data arrival driven calculation, not a background process.
RECORDING: in InfluxDB Out by default is disabled, when enabled, the default record name is
performance.polar.target.velocityMadeGood.
Actual CMG
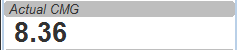
Actual Course Made Good, aka VMC: the component of your boat speed towards a waypoint. We’re moving with 8.36 knots towards that waypoint.
Quite valuable to know on reaching courses towards a waypoint.
\(CMG = STW*cos(Heading - MarkBearing)\)
DATA: the calculated data is made available to other instruments as
OCPN_DBP_STC_POLCMG: The instrument must be running (but not visible) - this is asynchronous, data arrival driven calculation, not a background process.
RECORDING: in InfluxDB Out by default is disabled, when enabled, the default record name is
performance.polar.actual.courseMadeGood.
Target CMG Angle

Optimum angle to sail fastest to a waypoint, based on your polar data (Like VMG, but not up-/downwind but towards a waypoint).
DATA: the calculated data is made available to other instruments as
OCPN_DBP_STC_POLTCMGANGLE: The instrument must be running (but not visible) - this is asynchronous, data arrival driven calculation, not a background process.
RECORDING: in InfluxDB Out by default is disabled, when enabled, the default record name is
performance.polar.target.courseAngle.
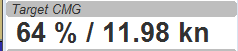
Target CMG

Same as Target VMG, but towards a waypoint. Means : “If we would sail 130° (Target CMG Angle, from ex. above), we would move towards the waypoint with 11.98 knots, but currently we’re only doing 64% of that.
NOTE: Calculation is verified, but it doesn’t tell you if you are on the correct tack.
DATA: the calculated data is made available to other instruments as
OCPN_DBP_STC_POLTCMG: The instrument must be running (but not visible) - this is asynchronous, data arrival driven calculation, not a background process.
RECORDING: in InfluxDB Out by default is disabled, when enabled, the default record name is
performance.polar.target.courseMadeGood.
Polar Performance
A great sail trimming aid:
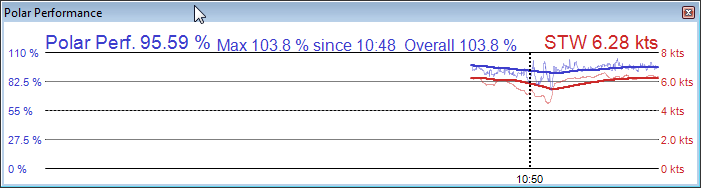
A graphical history instrument like Wind History or Baro History.
The history instrument plots the STW (speed through water) as percentage of the polar speed data (=100%) for the actual true wind speed TWS and true wind angle TWA. It is this comparison in the polar chart above, plotted as percentage.

The idea is to provide a simple sail trimming aid, as the percentage value is quite stable in comparison to the real speed values. The TWA / TWS is constantly adjusted while reading the polar data.
As long as the filtered curve continues to climb or is 100%, or even better your trim adjustments are correct! But if the curve points down, you’re sailing is getting worse and you better do something for it!
NOTE: while the actual boat speed can be greater than the polar speed, the percentage value shown is limited to maximum of 150 % - if you see values like this, there is something wrong in the polar file or in STW/TWA/TWS values.
DATA: the graphical history instrument is not sharing its data with other instruments.
RECORDING: the data can be recorded only in CSV files as with other graphical instruments. If you find it cumbersome to collect data from various CSV-files, please consider using DashT time series database streaming which allows you to collect all data for post-race analysis or even to display it on-line, when underway. It is enough to have the performance and other instruments in their single line, numerical format and to activate their recording in InfluxDB Out to save the raw values calculated by this instrument and to do the statistical calculations using the various Flux mathematical functions either in InfluxDB or on the Grafana dashboard, both available off-line or on-line.
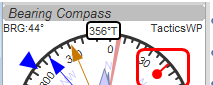
Bearing compass

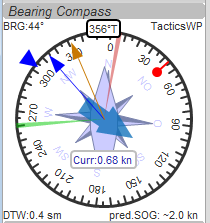
This instrument is inspired by NKE’s tactics page, and is called here as “Bearing Compass”. Let’s walk through this feature rich instrument:

The uppermost, numerical embedded display shows the true heading (HDT), in the above example 356°T.

The center part of the instrument depicts a blue surface current arrow, based on boat heading (HDT) and shows the current speed, “Curr: 0.68 kn” in our example.

Furthermore we have the blue, thin arrow, which is TWA on boat axis. It also shows the TWD on the degree scale (315° in the example) and the AWA arrow in orange/yellow.
NOTE: Many colors, like the orange/yellow are inherited from the Dashboard dials and defined in OpenCPN - please not that where DashT provide a way to customize the Dashboard dials, the customization will take also place in Tactics dials for this reason. However, blue and red arrows, layline and red dot colors cannot be changed. Up to you to find the right combination of colours from the OpenCPN color palette.
You see the red/green laylines, which are based on COG. As with the laylines on the chart, the second layline shows you where you end up sailing the same TWA on the other tack. Leeway and current are taken into account. Use the second layline together with the waypoint marker described below.
NOTE: The calculation is based on TWA. Especially when sailing downwind with a gennaker, your apparent wind angle depends very much on the speed of the boat. As soon as the gennaker start working aerodynamically, it’ll speed up the boat and your AWA will show lower values (points more foreward). If you gybe now, your boat speed will drop, and although sailing the same TWA, your app. wind angle will be higher than before. You will have to bring you boat back up to speed to see the same AWA than before the tack. This can be tricky when you’re close to a buoy and don’t have much space/time to speed up your boat again.

The blue triangle outside the degree scale is the Target-VMG Angle (Target TWA).
Simply adopt your course to place your blue TWA-arrow on the Target-VMG pointer, and you sail optimum (polar based) speed up-/or downwind.
If a waypoint is active, either by a NMEA-RMB sentence from your GPS or the temporary tactics WP which you can place on the chart, you will see the WP as a red dot.
NOTE: The manually placed tactics waypoint overrules any simultaneously available RMB-sentence defined waypoint, including those RMB sentences created by the OpenCPN routing functions.
Change your course and place it towards the red dot and you will directly bump into your waypoint marker.
You can also use the second layline to determine when it is time to tack so that you are sure to make it around the waypoint: the red dot should be outside the second layline before doing so.
The upper part of the bearing compass will give you
BRG bearing angle to the waypoint
TacticsWP = name of the waypoint (if Tactics Waypoint dropped, always this)

In the lower part of the Bearing Compass instrument will give you
DTW = distance to the waypoint
predicect speed over ground (SOG) on the other tack.
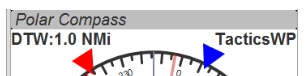
Polar Compass
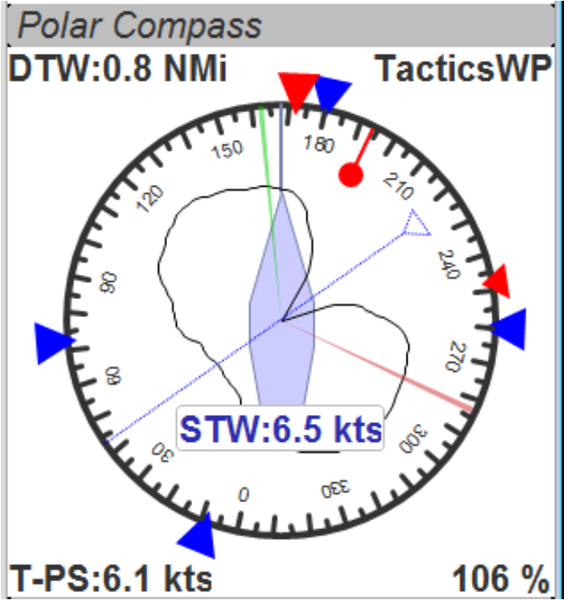
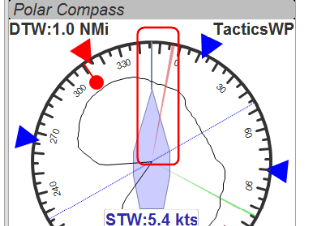
This instrument is derived from Bearing Compass. If you a polar loaded, it shows you the actual polar ring. The size of the ring is normalized, i.e. it has always the same size.
The polar is rotated with the TWD, which is shown as thin blue line here. In this example True Wind Direction is 226°, the wind is blowing from port aft, boat’s true heading being 168°.
The thin blue vertical line, highlighted in green color in the above picture is indicating the true heading, HDT.
The 4 blue markers (triangles) are showing the Target-VMG angles, up- and downwind. They are based on the actual polar ring and are moving with the polar.
The red marker(s) (triangles) are the Target-CMG angles towards the active waypoint. They are only shown if you have an active waypoint set either via NMEA-RMB or by dropping the Tactics waypoint on the chart.
In contrary to the Bearing Compass, the VMG/CMG markers are shown in conjunction with the polar and are rotating with the polar/true wind angle.
The red dot inside the compass shows the bearing to the waypoint, like in the Bearing Compass.
To sail optimum VMG- or CMG-Angle, change your course in a way that the boats heading line (the thin blue line from the bow) points on the marker of your choice.

Top left and top right data fields are showing:
DTW = Distance to Waypoint
TacticsWP = name of the waypoint (if Tactics Waypoint dropped, always this)
The lower center numerical data is speed through water (STW).
The two bottom fields are
T-PS : Target Polar Speed
PolarSpeed-% = the percentage of you actual STW compared to the Target Polar Speed

Furthermore you see the laylines which are based on COG. In this example, there is a angle between the HDT line and the layline, meaning that we have a significant drift!
NOTE: There may be two red CMG pointers on the outer ring. They are based on Bearing and True Wind direction. Generally one of them is preferred, because you approach the waypoint faster following it. The preferred one arrow has a bigger size!
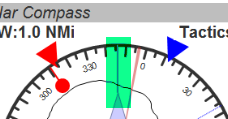
Let’s walk through the below example use case in the Polar Compass:
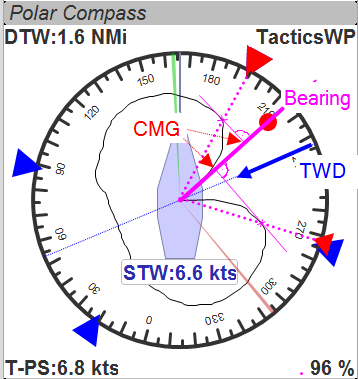
We have TWD, shown with the blue arrow. The polar is rotated with TWD.
Next, we have the bearing to the waypoint, see the solid purple line “Bearing”.
From this solid purple bearing line, we have to find the tangent on the polar curve to both sides. The tangent is - in relation to the purple bearing line – the highest point of the polar curve.
Graphically one draws perpendicular lines from the purple bearing line to either side until it just touches the polar curve.
The length on the purple bearing line, measured from the 0-point of the polar, to the perpendicular intersections (marked CMG) corresponds to the Target CMG speed.
Temporary waypoint and Target-TWA laylines
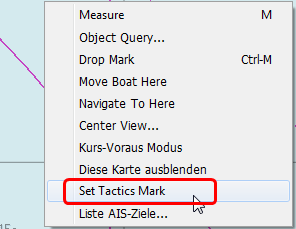
You can right-click on any place on the chart and drop a temporary Tactics waypoint (exactly one).
NOTE: this OpenCPN function can be a bit tricky and the point does not always go where you think you clicked (but you can move it by dragging it). You can attempt to keep the cursor strictly within the limits of the dialog depicted above: OpenCPN remembers the last cursor position on the chart when you finally click the menu item, which is quite far from the original click position.
As soon as you activate the layline display - or if it is already activated, the plug-in will do a Target-TWA calculation to that WP, based on the current TWD and your boat polar. Surface current is taken into account.
You can delete that waypoint as any other WP. Select it with right click and choose “Delete”. You can sldo drag the waypoint on the chart, it behaves like a normal waypoint and appears in the waypoint manager.
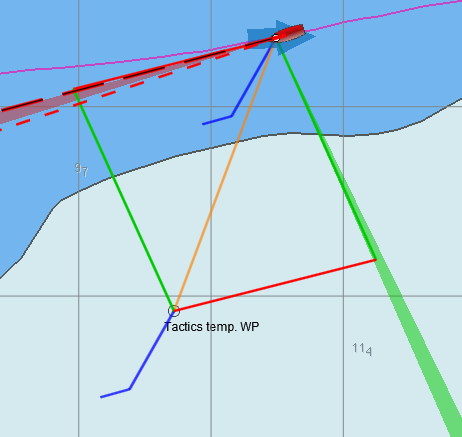
The chart functions takes the Target-VMG (Target-TWA) angle up-/downwind and applies it to our boat as well as to the temporary Tactics waypoint mark.
If there is a line intersection, it chops off the lines at the intersection so that you remain strictly in the perimeter defined by the temporary Tactics waypoint mark.
Colours green and red are again the wind directions green = wind from starboard, red = wind from port.
Additionally, Tactics is doing a polar based calculation to see if the direct course would be faster compared to the Target-VMG calculation.
In that case you’ll get a red or green line directly to the waypoint. Colour depends on the side the wind is blowing from. Wind from port → red, wind from starboard → green
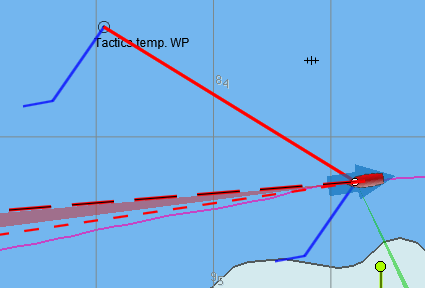
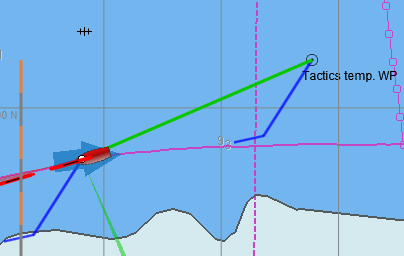
You may have noticed that Tactics is placing a wind barb also on the temporary Tactics waypoint mark.
NOTE: In the contrary to the weather routing plug-in, Tactics is not, explicitly, using grib files for current/wind info. The the temporary Tactics waypoint mark” is meant for a quick, near run around a buoy, cape of an island, etc. using the surface current and the live wind data we currently are experiencing. Just drop a mark on the chart and off you go. Delete it, drop it somewhere else, and boom, off you go again in agile sailing! Maximum one tack/gybe per mark dropped, not more.
NKE-style Perf.Records
NKE supports the upload of specific performance data to their instrument bus, which can be shown in their display devices. These records are polar based and unless you’re using their (quite expensive) regatta processor, Tactics gives us an easy way to display e.g. the “Target Polar Speed” outside in the cockpit on the standard instrument displays.
NOTE: Due to the lack of information on other manufacturers’ systems interfaces or capabilities, Tactics implements this for the NKE systems only for now. Also, be aware that OpenCPN can only import/export NMEA183 right now, but not NMEA2000 or SeaTalk. Any use cases allowing to overcome these limitations will be welcome!
The following five NKE-records are implemented :
Speed and performance target
Speed and performance target
$PNKEP,01,x.x,N,x.x,K*hh<CR><LF>
       |         \ target speed in km/h
        \ target speed in knots
Course on the next tack
$PNKEP,02,x.x*hh<CR><LF>
          \ Course (COG) on other tack from 0 to 359°
Opt. VMG angle and performance up and downwind
$PNKEP,03,x.x,x.x,x.x*hh<CR><LF>
          |   |   \ polar speed performance TWA/TWS from 0 to 99%
          |    \ performance upwind or downwind from 0 to 99%
           \ opt.VMG angle  0-359°
Angles to optimise CMG and VMG and corresponding gain - available but has not been verified due to lack of a compatible NKE-instrument:
$PNKEP,04,x.x,x.x,x.x,x.x*hh<CR><LF>
          |   |    |  \ Gain VMG from 0 to 999%
          |   |     \ Angle to optimise VMG from 0 to 359°
          |    \ Gain CMG from 0 to 999%
          \ Angle to optimise  CMG from 0 to 359°
Direction and speed of sea current
$PNKEP,05,x.x,x.x,N,x.x,K*hh<CR><LF>
          |   |      \ current speed in km/h
          |    \ current speed in knots
          \ current direction from 0 à 359°

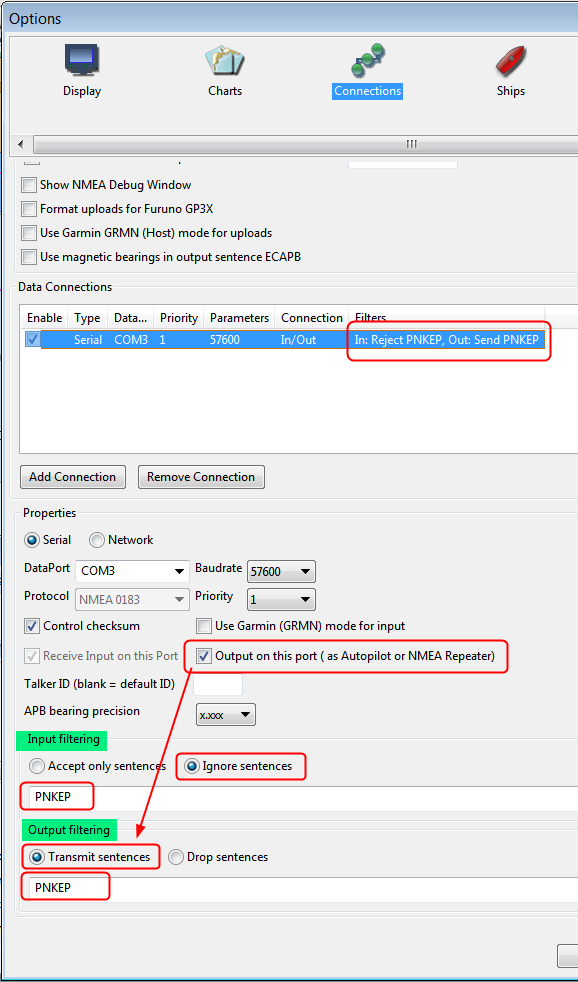
These five NMEA183-records all begin with a $PNKEP and are created on the fly using the data calculated in the plug-in and are sent to OpenCPNs NMEA stream. To send the records to your instruments, you have to define an outgoing connection in you Interface connections, e.g. like this :
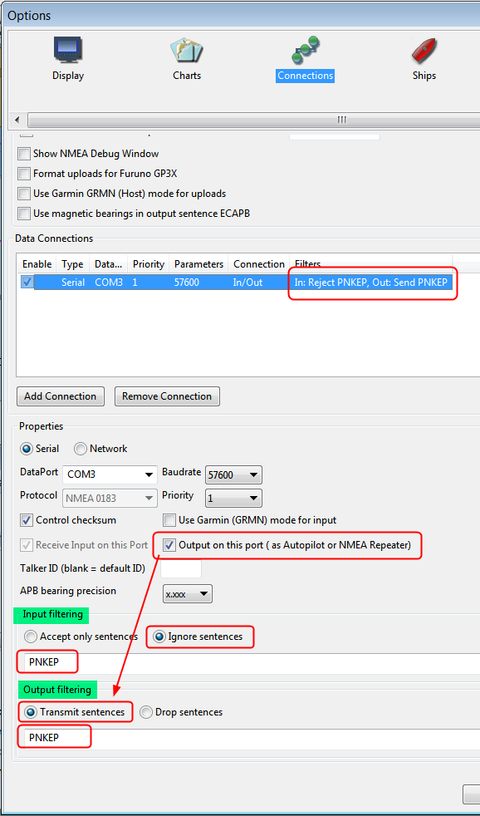
Set an output filter as shown above, filtering for PNKEP. After the set up, you should see records beginning whith $PNKEP, in your NMEA debug window.
NKE exports the $PNKEP sentences as soon as they re available on the topline bus. Normally they are calculated in their regatta processor and then exported to the PC.
Therefore ignore all incoming $PNKEP-sentences! Click on Input filtering (see screenshot above), select Ignore sencences and add PNKEP.
Do not forget to re-init your NMEA data stream in your instruments, to make sure the new records are accepted.
NOTE It can be quite challenging to teach to a NKE TL25 mast display these new sentences since their frequency is not very high. So you need to be patient and try several times.
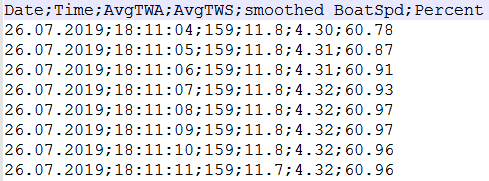
Data Export
This function which allows to write data in CSV (comma separated values) file is originating from Tactics, therefore it is explained here. It has been implemented also in Wind History and Baro History instruments, which are under Dashboard instrument category. Here we use the Polar Performance instrument for an example.
NOTE: the preferred method to save data in DashT is InfluxDB v2.0 time series database, but if one does not want to use it the exported CSV-file recordings allow information limited to a single historical data instrument saved for for importing to a spreadsheet, Jupyter Lab, on-line services, etc. Please see the distribution repository’s examples for developers using CSV-files.
For these three instruments, there is a button for this purpose, placed on the upper left corner:
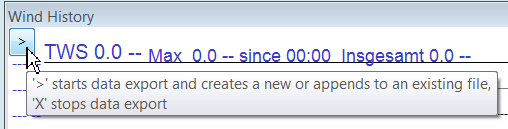
Once you click the ‘>’ button, a menu pops up where you can select the export rate (the latest setting is saved to opencpn.ini and will be set as default at startup for the next usage).
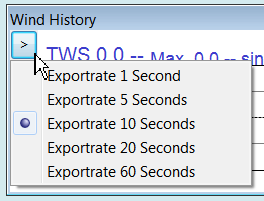
After selecting one of the export rates, a file selection dialog is opened asking from you for an export file name.
If you give it an existing name, the data will be appended (added) at the end of the file.
If the file does not exist, it will be created.
Like the export rate, also the filename is stored in opencpn.ini and set as default for the file selection dialog.
There is NO logical check on the content of the file if you decide to use an existing file!
Once the export is running, the button changes to X :
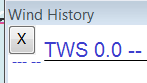
To stop the data export, click the X . Export stops immediately.
The export files always contains the current date, local time (incl. sec.), and the instruments data; the first line in the file is always the headline with the field description. A standard wxWidgets function is used to format date and time, taking your local date/time settings into account. You can use Dashboard instruments to check the local time of your computer and compare it to the stored values.
The data separator can be set, it does not have to be a comma, in this Polar Perfomance export example it is a semicolon ;

NOTE: To reduce the system load, the internal timer for the baro history instrument is set to 5 seconds, i.e. only every 5 seconds, the display is updated. This should be good enough for barographs which generally export their data at even lower rates.

“Prepend Clockticks & Prepend UTC Timestamp” : With these ticks you can add Clockticks and a UTC Timestamp to the data export, at the beginning of each line of exported data.
This can be useful if you intend to process the data afterwards, e.g. via InfluxDB, Grafana, etc.
“Data Separator” : You can define and set your own column separator here, instead of the ini-file method described above. A Tab is represented by \t if it is required as separator.
Tactics terminology
Term |
Description |
|---|---|
AWA |
Apparent Wind Angle; the relative wind angle measured by your wind sensor, related to the boat axis(0°…180°) |
AWS |
Apparent Wind Speed; the relative speed of the wind measured by your wind sensor |
CMG |
Course Made Good; the relative speed approaching a waypoint. This term may be customized to whatever you like. See the ini/conf-file chapter for “CMGSynonym” |
COG |
Course Over Ground; generally supplied by the GPS |
HDG |
Magnetic heading of your compass; not compensated with mag. variation |
HDT |
True heading of your compass. “True” means compensated with magnetic variation |
Heel |
The angular degrees how your boat is heeled (leaning) sideways due to any force from outside (wave, wind, water ballast on one side of the boat, swing keel etc….) |
CRS |
Course through water; HDT + Leeway, but without currents |
Leeway |
The drift of your boat caused by the wind. As soon as the wind is blowing it implies a force on your boat, the boat starts drifting. Leeway is not including any drift due to surface currents ! That’s actually the challenge :-) you can manage with Tactics! |
SOG |
Speed Over Ground; generally supplied by the GPS |
STW |
Speed Through Water; the info that is returned by your “paddlewheel” sensor |
Target CMG |
The optimum speed / angle towards a waypoint; aka VMC |
Target VMG |
The optimum speed / angle up- or downwind with reference to the true wind direction (without a waypoint) |
TWA |
True Wind Angle; the angle of the true wind relative to the boat axis (0°…180°). The unit then gives you the direction as “>”=port, “<”=starboard |
TWD |
True Wind Direction; true wind direction related to the compass rose (0°..359°) |
TWS |
True Wind Speed; the speed of the wind in the atmosphere |
VMC |
Velocity Made on Course; same as CMG |
VMG |
Velocity Made Good; the relative speed up-/downwind with reference to the true wind direction. This term may be customized to whatever you like. See the ini/conf-file chapter for “VMGSynonym” |
Align your compass
Swing your compass as described by the manufacturer
Connect your GPS to O to get a stable position
Make sure you have true heading available (use wmm_pi, in case you don’t get the mag. variation from the GPS)
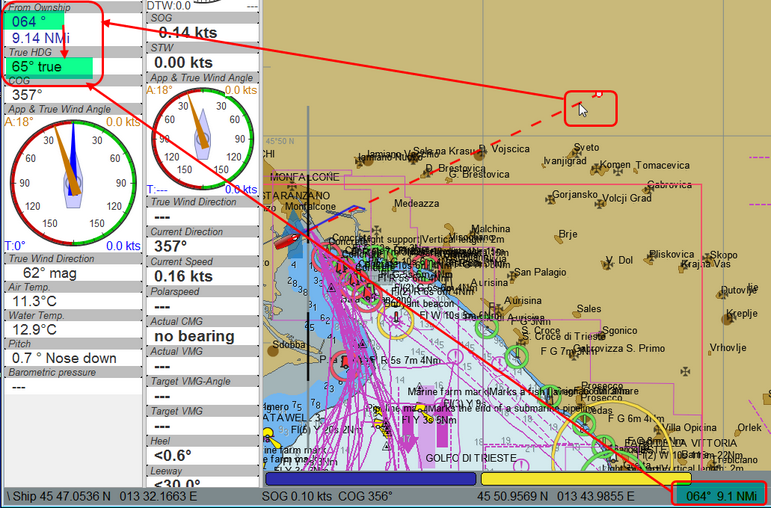
Directly in OpenCPN, set your heading predictor to a high value, e.g. 10 miles

Put the mouse onto the (thin HDT) predictor line towards the end of the line (the long line reduces the error).
Simply compare now the true heading with the status line or the “From Ownship” display…
Then adjust your compass (in this case : -1°)